Make Perfect Wood Toy Axle Holes
Learn to build a wood toy axle hole jig to use for one toy or for mass production. Drilling an accurate location for axle holes on matching parts for toys like the Super ReallyWood Combine and the Super ReallyWood Big Farm Tractor and Trailer is critical for perfectly level and non-binding rotation of the wheels and axles.
This simple setup will guarantee the right drill locations for the axle holes in the chassis. You can re-use the jig many times and achieve perfect axle hole alignment on each part.
To download a PDF file of the plan set for building the jig scroll to the bottom of this article.
How to Make Perfect Wood Toy Axle Holes for One Toy or for Mass Production
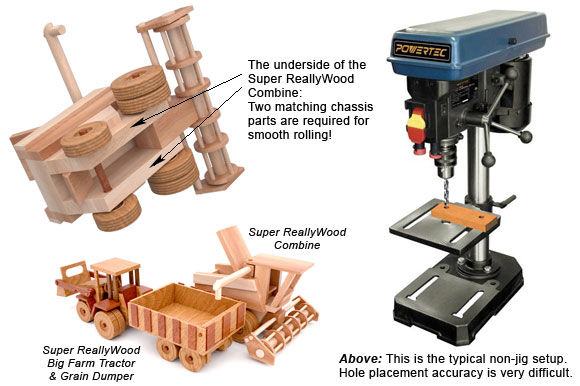
Above: Drilling an accurate location for axle holes on matching parts for toys like the Super ReallyWood Combine and the Super ReallyWood Farm Tractor & Grain Dumper is critical for perfectly level and non-binding rotation of the wheels and axles.
Building the Jig:
You’ll need a Jig Base, Jig Bottom Clamp and Back Stop. These parts are 3/4” thick material. You’ll also need two End Stops made from 1/2” diameter by 2” long hardwood dowels. The Jig Bottom Clamp on the underside of the drill press table is 3/4” thick x 1-1/2” wide by the length of the drill press table. The Jig Base and Back Stop are cut to a size that will conveniently fit on the drill press table. The Back Stop is permanently glued to the Jig Base. The distance between the two End Stop dowels is 2” greater than the toy part to be drilled. For example: The space between the End Stop dowels is 12” for a 10” long chassis part. See photo below: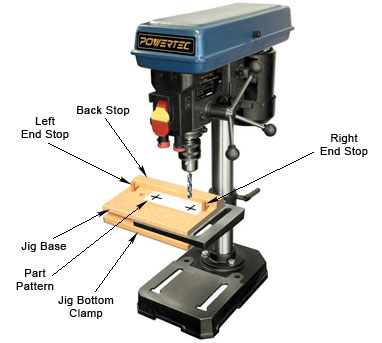
Photo above: The Part Pattern showing the center location of the axle holes is attached with movable adhesive spray to the jig and is positioned flush against the right End Stop dowel as shown in the photo above. Using a drill bit the diameter of the hole specified on the part pattern, the first axle hole is drilled into the jig. Then the pattern is moved flush against the opposite End Stop dowel and the second axle hole is drilled in the jig. Your jig is now complete.
Drilling Your Wood Toy Chassis Parts:
Before drilling the toy chassis parts align one of the jig holes perfectly with the drill bit and then clamp the jig firmly in place with C-clamps or bar clamps against both the top and bottom jig pieces. The Jig Bottom Clamp piece provides a flat surface for the C-clamps to insure a tight grip of the axle hole jig on the drill press table. See photo below: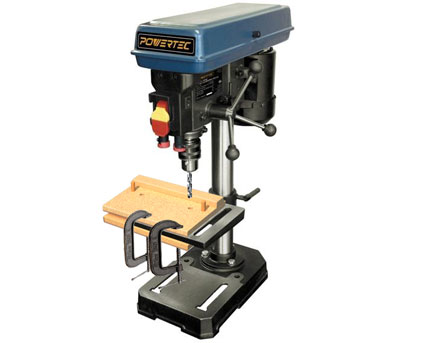
Above: Align one of the jig holes perfectly with the drill bit and then clamp the jig firmly in place with C-clamps or bar clamps.
The wood toy chassis part to be drilled is placed on the drill jig and pressed against the End Stop dowel nearest the drill bit and against the Back Stop as shown in the photo below. The axle hole is then drilled through the wood toy chassis part. See photo below: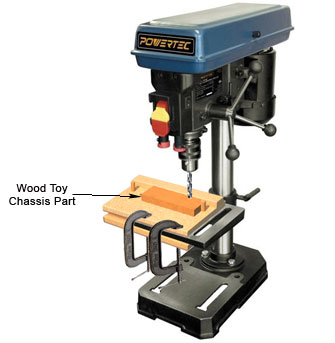
Above: The wood toy chassis part is placed on the drill and pressed flush against the End Stop. The chassis is in position and ready to drill the axle hole.
The clamps are then loosened and the opposite jig hole is aligned with the drill bit. The jig is then re-clamped in the new position. The wood toy chassis part to be drilled is placed on the drill jig and pressed against the stop pin nearest the drill bit and against the backstop. The second hole is then drilled through the toy part. See photo below: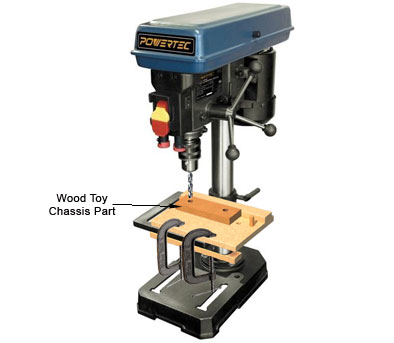
Above: Reposition the jig and re-clamp the jig into place to drill the second axle hole into the wood toy chassis
The Wood Toy Axle Hole Jig can be used for one toy or for mass production of toys. You can re-use the jig many times with perfect axle hole alignment on each part. Just make sure you align the drill bit with the axle hole and the jig, and then clamp the jig firmly in place in that position.
TIP: When mass producing wood toy chassis parts use the jig in one position to drill all the toy parts, and then switch the jig to the opposite position to drill all of the remaining holes at one time.
TIP: If you want to drill both holes in the chassis without moving the jig it's done with a removable end-stop dowel. At one end of the jig two holes are drilled for the chassis holes. One hole is drilled the distance from the end-stop dowel for the first axle hole that is shown on the chassis pattern. The other hole is drilled the distance from the end-stop dowel for the second axle hole that is shown on the chassis pattern. When drilling the chassis part axle holes the end-stop dowel is placed in the jig hole for that hole position. We’ve drilled both holes in thousands of chassis parts quickly with this method.
Download the PDF Plan Set of the Jig
